

You light the candle, kill the overhead lights, set up the shot exactly the way every cozy-aesthetic candle ad looks. Then you check the photo and the flame is a featureless white blob with a vertical streak bleeding up through the wick, like the sensor tried to smear the fire across the frame. The wax, the label, the vessel all look fine. Just the one bright point in the shot is wrecked.
That's not a bad camera or a bad photographer. It's a hard physical limit inside every digital camera sensor, and an open flame is one of the few everyday objects that reliably triggers it. Here's what's actually happening, why candle brands hit it more than almost anyone else shooting product photography, and how to fix a flame-blown photo without reshooting the candle at all.
What's Actually Happening to Your Candle Photo
Every pixel on a digital camera sensor is a tiny bucket that fills with electrical charge as light hits it. Each bucket has a maximum capacity, called its full well capacity. Point a camera at something extremely bright relative to the rest of the scene, like an open flame in a dim room, and the pixels under that flame fill past capacity almost instantly while the rest of the frame is still gathering light normally.
Oxford Instruments' technical reference on the phenomenon, known as blooming, explains what happens next: once a pixel hits its saturation level, the excess charge doesn't just disappear. It spills into neighboring pixels. "Blooming occurs when the charge in a pixel exceeds the saturation level and the charge starts to fill adjacent pixels," and because most sensors are built to shift charge vertically during readout, "the excess charge will preferentially flow into the nearest vertical neighbours," which is exactly why the artifact shows up as a streak running up and down from the light source rather than spreading evenly in every direction (Oxford Instruments / Andor Technical Article, "CCD Blooming and Anti-Blooming").
Florida State University's Hamamatsu-sponsored imaging reference describes the same failure from the electronics side: once a photodiode's charge capacity or the sensor's charge-transfer capacity is reached, "accumulation of additional photo-generated charge results in overflow, or blooming, of the excess electrons into adjacent device structures," producing everything from a visible white streak to a total loss of detail at the output stage (Hamamatsu Learning Center, "CCD Saturation and Blooming"). Modern CMOS sensors, the type in essentially every phone and mirrorless camera shooting product photography today, handle this more gracefully than older CCD chips, but they don't eliminate it. An open flame is bright enough, and small enough, to overwhelm even a well-designed anti-blooming structure.
Why Candle Brands Hit This More Than Almost Anyone Else
Most product categories don't put their own light source directly in the shot. A skincare bottle, a sneaker, a phone case: none of them are emitting light the camera has to meter around. A candle is different. The entire point of a lit-candle hero shot is capturing the flame itself, and the flame is often thousands of times brighter than the ambient light the rest of the scene is exposed for. Shoot for the room and the flame blows out. Shoot for the flame and the room goes black. There's no single exposure setting that satisfies both, which is exactly the setup Oxford Instruments describes as triggering blooming: a strong signal next to a comparatively weak one in the same high-dynamic-range frame.
This is also why the fix can't be "just relight it and try again." The physics don't change with a better bulb or a diffuser. A brand can burn through an entire afternoon reshooting the same lit candle under slightly different conditions and get some version of the same blown-out flame every time, because the flame's actual brightness relative to the room hasn't moved. A brand that ends up restaging a hotel's mixed-lighting lobby shot instead of masking the one bad light source runs into the same wasted-afternoon problem.
The Fix: A Tight Mask on the Flame, Not a Relight of the Whole Photo
The move that actually works is the same one that already fixed a jewelry brand's blown-out polished-metal highlight and a wedding brand's blown-out lace detail: mask only the blown region, and let an AI photo editor rebuild texture there while leaving everything else in the frame untouched.
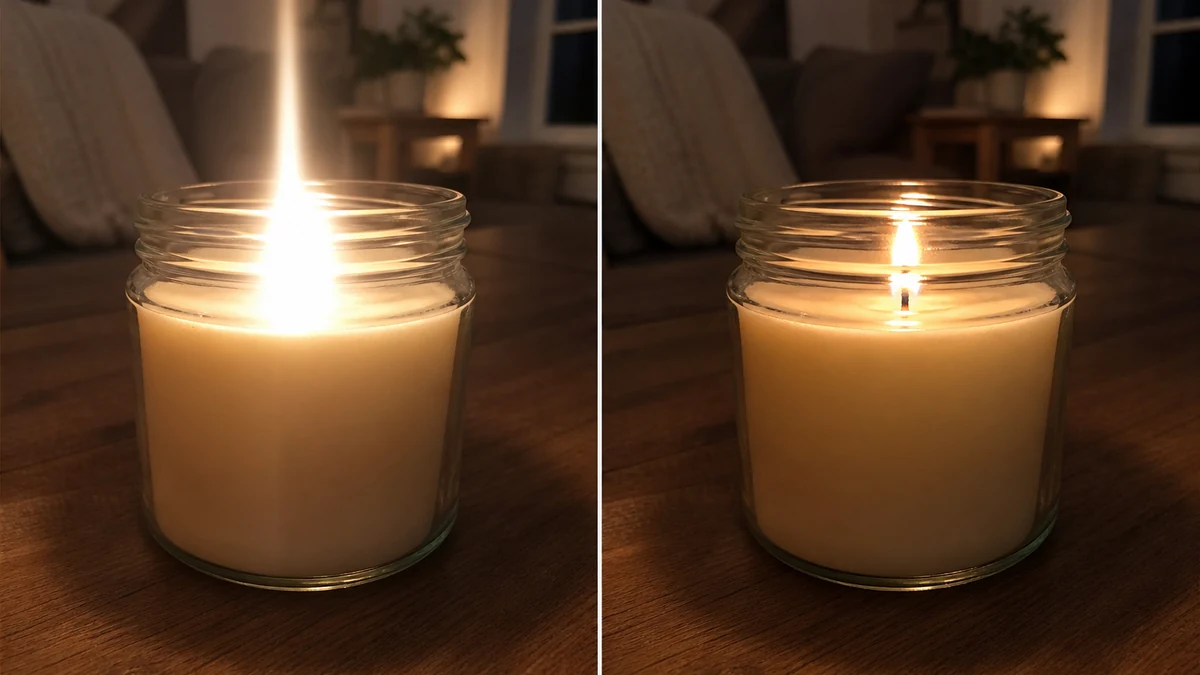
Illustrative still, not the live render. mcp.coinis.dev access was down at publish time, so this generic AI-generated before/after substitutes for the real enhance_asset_proxy repair described above. The real render will replace this still in a future update once the connection is restored.
The same lesson that has held across every localized-highlight fix this pipeline has shipped applies here: a full-frame mask or a prompt that names the specific defect by color invites the model to redraw the whole scene instead of correcting the one problem region. A mask scoped tightly to the flame and its immediate blown halo, paired with a prompt describing only the target result in neutral terms, keeps the fix contained to the one spot that's actually broken.
From One Fixed Photo to Every Ad Size You Need
A corrected flame is the input, not the finish line. The same corrected photo still needs to become a square Instagram feed post, a 9:16 Story or Reel cover, and a landscape banner for a display network, each with its own crop and composition, without paying for three separate photo shoots or three separate editing passes.
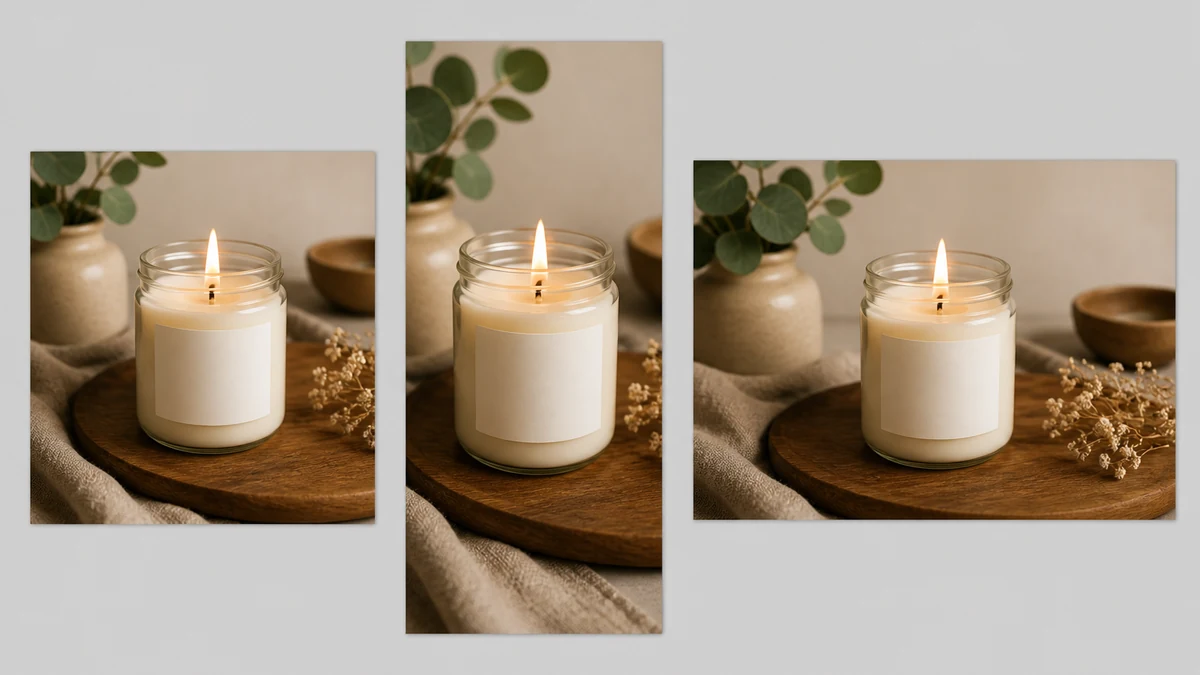
Illustrative still, not the live render. mcp.coinis.dev access was down at publish time, so this illustrative fan-out substitutes for the real generate_image_templates render described above. The real render will replace this still in a future update once the connection is restored.
That's the actual workflow a candle brand's ad account needs on a Tuesday afternoon before a launch: one usable hero photo in, every channel's native format out, with the flame reading as an actual flame in each one instead of a lighting mistake baked into the source file. The same one-photo-to-every-ad-size workflow applies regardless of which defect got fixed first.
What to Do Now
Don't reshoot the candle. Take whatever lit-candle photo already exists, even the one with the blown-out flame sitting in a folder somewhere, and run it through Coinis Ad Studio's photo-repair pipeline. Mask the flame, correct it once, then generate every ad size your campaign actually needs from that single corrected image instead of restaging the shot for each platform. The same pipeline already fixed a jewelry brand's blown-out metal hotspot in a localized-highlight repair, rebuilt a spa's underexposed candlelit ambiance shot, and corrected a bakery's fluorescent glaze glare. A launch-ready Ad Studio template turns that one corrected photo into a real campaign instead of a single static post.
FAQ
Why does my candle's flame look like a white blob instead of a flame in photos? The flame is far brighter than the rest of the scene, so the camera sensor's pixels under the flame saturate and spill excess charge into neighboring pixels, a phenomenon called blooming. It shows up as a featureless bright area with a vertical streak, not as a sharp, detailed flame shape.
Can I fix this with camera settings instead of editing? Partially. Underexposing the whole shot to protect the flame will darken everything else past a usable point, and a faster shutter speed only helps if the flame is the sole light source, which it usually isn't in a styled product shot. There's no single exposure setting that captures both a natural-looking flame and a properly lit room in one frame.
Does this happen with unlit candle photos too? No. An unlit candle has no extreme bright point in the frame, so there's nothing to trigger sensor saturation. This is specific to lit-candle and other open-flame product photography.
Will masking the flame area change the rest of my product photo? Not if the mask is scoped tightly to the flame and its immediate blown halo. A tight mask paired with a fix prompt that avoids naming a specific color keeps the correction contained to that one region, leaving the wax, vessel, label, and background pixel-identical to the source.
What ad sizes do I actually need from one corrected photo? At minimum a square crop for feed placements, a 9:16 vertical for Stories/Reels, and a landscape crop for display and YouTube. Coinis Ad Studio generates all three from a single source image rather than requiring a separate edit for each platform.
Sources
- Oxford Instruments / Andor, "CCD Blooming and Anti-Blooming": https://www.oxinst.com/learning/view/article/ccd-blooming-and-anti-blooming
- Hamamatsu Learning Center (Florida State University), "CCD Saturation and Blooming": https://hamamatsu.magnet.fsu.edu/articles/ccdsatandblooming.html
- IBISWorld, "Candle Manufacturing in the US" (industry market size): https://www.ibisworld.com/united-states/industry/candle-manufacturing/4260/

Isidora Matovic
Author
Social media enthusiast and a full time researcher. She takes digital presence very seriously and that is why you are always in touch in what is going on with us! Follow us for more posts like this.